If you’re looking to boost your home theater’s audio setup, you may be wondering how to connect subwoofer to Denon receiver. Luckily, it’s not as complicated as it may seem. In this article, we’ll walk you through the process step by step so that you can enjoy those low frequencies in no time.
Contents
Why you need a subwoofer
A Best 12 Inch Subwoofer is an important part of any home theater system. It adds depth and realism to the sound of movies and music. The subwoofer is the foundation of the sound system, providing the low frequencies that give the system its power and punch.
In order to get the most out of your subwoofer, it is important to connect it properly to your Denon receiver. This process is relatively simple, but there are a few things you need to know in order to do it correctly.
First, you need to make sure that your Denon receiver has an “LFE” output. This stands for Low-Frequency Effects and is specifically designed for use with a subwoofer. If your receiver does not have an LFE output, you can still use a subwoofer, but you’ll need to connect it to one of the main channels instead.
Here is a step by step guide, How To Connect Subwoofer To Denon Receiver
Are you trying to connect Denon receiver with subwoofer, but don’t know what is exactly need to do and how you can connect your Denon receiver successfully.? So read this guide carefully to understand. So lets change your problem to solution.
Step 1: Determine if your Denon receiver is subwoofer compatible
If you’re looking to add some extra thump to your home theater system, you’ll need to determine if your Denon receiver is subwoofer compatible. In most cases, Denon receivers will have a dedicated subwoofer output that can be used to connect an external subwoofer. However, some models may not have this feature and will instead rely on the use of speaker-level outputs.
To determine if your Denon receiver is subwoofer compatible, start by checking for dedicated subwoofer output. This will typically be labeled as “Sub Out” or “LFE Out” and will be located on the back of the receiver. If you don’t see a dedicated output, look for binding post or spring clip terminals that are labeled as “Subwoofer” or “SW.
Step 2: Choose the right subwoofer

There are a few things to consider when choosing the right subwoofer for your Denon receiver. The size of your room, the type of music you listen to, and your budget are all important factors.
If you have a small room, you’ll want a smaller subwoofer that won’t take up too much space. If you listen to a lot of bass-heavy music, you’ll need a subwoofer that can handle a lot of power. And if you’re on a tight budget, there are still some great options available.
Once you’ve considered all of these factors, it’s time to start shopping around. There are a lot of great Best Subwoofer out there, so take your time and find the one that’s right for you.
Step 3: Connect the subwoofer to the Denon receiver
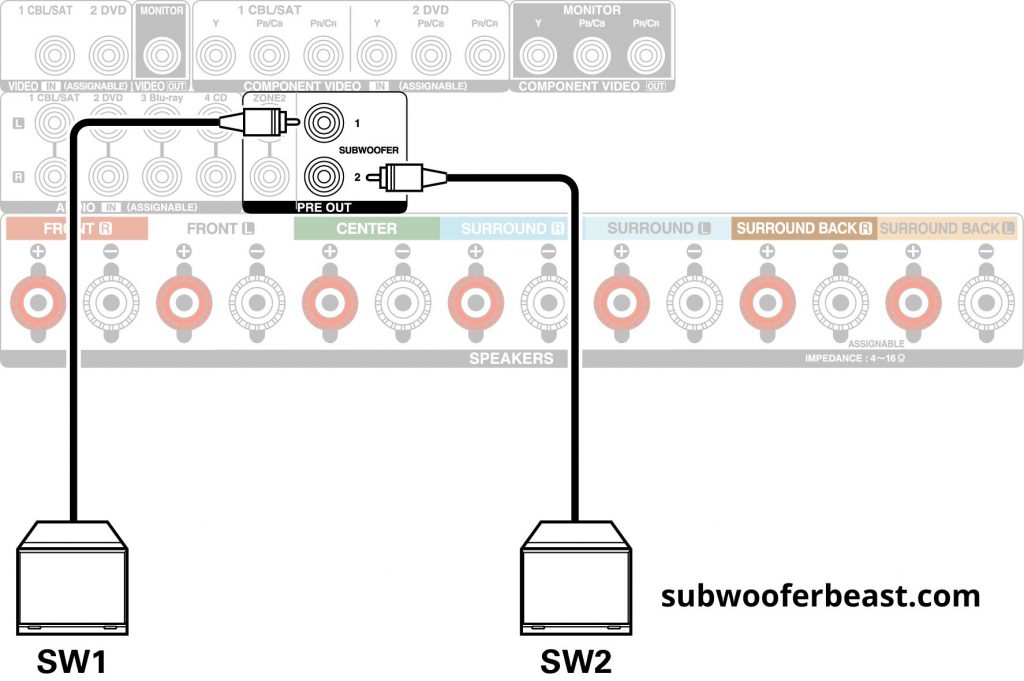
If you have a subwoofer that you want to connect to your Denon receiver, there are a few things that you need to do. First, you need to make sure that the subwoofer is compatible with the receiver. Second, you need to connect the subwoofer to the receiver using the proper cables. And third, you need to set up the subwoofer so that it will work properly with your system.
To start, let’s take a look at what you need in order to connect a subwoofer to a Denon receiver. The first thing that you need is a compatible subwoofer. Not all subwoofers will work with all receivers, so it’s important to check compatibility before making any connections.
Step 4: Set up the subwoofer
For those who want to get the most out of their music, it is important to set up the subwoofer properly. Here are the steps:
Another Method
Conclusion
In conclusion, connecting a subwoofer to a Denon receiver is a simple process that can be completed in a few easy steps. Following these steps will ensure that your subwoofer is properly connected and will provide you with the best possible sound quality.